 Skip to content
How to Make a Handmade Viking Axe | The Ultimate Guide
- by Asad Musla
What makes a Viking hatchet?
How to make a Viking axe weThe first step is to explain what makes something a "viking hatchet" rather than any of the other hatchet designs that have been around for a long time.
The many purposes that each strategy was meant to fulfill and the ranch endlessly tomahawks, which were made especially for fighting, differed in a number of important ways. One of the primary places where the plans diverged was in the hatchet head's appearance. The hairy hatchet design of many Viking tomahawks allowed for greater movement and a longer bleeding edge while also reducing the hatchet's weight. Probably created in Scandinavia in the early Middle Ages, this plan is frequently linked to the Vikings. The Brave Viking Hatchet and the Two Gave Hatchet.
There were also other patterns to choose from. The handle of the 'Dane' hatchet, for example, was significantly longer than that of the typical woodcutting hatchet. Because it took into account longer-lasting attacks during fight, this was better than previous hatchet plans. The cutting edge of the hatchet was additionally curved to apply maximum force to a limited area during influence. The Dane hatchet's straight, smooth handle allowed the user to slide their hands along it, enabling longer reach strikes and efficient hand posture changes.
According to a few credible sources, such as the Bayeux embroidery, the larger tomahawks designed for combat could have measured up to 1.4 meters in length. Additionally, there were smaller tomahawks that were meant to be used in one hand in relation to a shield. These were likely between 60 and 70 cm long. Metropolitan's photograph of the Bayeux embroidery, 2005 CC3.0
There is almost no evidence that two-sided Viking tomahawks were ever used in any real-world context because historians typically consider this to be a pipe dream. All Viking tomahawks mentioned in credible sources and those discovered at real-world locations have been single-sided. Since this is the more established and realistic of the two strategies, we will focus on creating a one-sided hatchet in this post.
What materials were generally utilized?
Because of many factors, such as the availability of materials and tools for assembly, the traditional methods used to make Viking hatchets during the Viking era were quite different from the methods used to make tomahawks today.
The bulk of tomahawks manufactured in Scandinavia during the Viking age were composed of iron, specifically marsh iron, however it has been demonstrated that many of them had a steel tip inserted to increase the edge's retention capacity. Furthermore, there is proof that some tomahawks from the Viking age were constructed of bronze, however historians are not sure why this would have been preferred over other materials that were accessible at the time.
Actually, given the enormous advancements in steel quality and assembly techniques that have been made since then, these tomahawks would have been inferior to modern models in almost every exhibition metric.
Ventures for making the hatchet by means of the conventional technique:
1: Fashioning the Hatchet head
The hatchet head would be produced using iron and fashioned the hard way. One of the most widely recognized techniques was to level the metal out and twist it around a bar to make the eye of the hatchet head. Interaction of Producing a Hatchet Head—Hurstwick
A hatchet head can be made using a variety of methods, such as the punch and float procedure, which involves punching a hole in the metal to create the hatchet's eye. Compared to the fold-over method, this accounts for a thicker hatchet head.
Although there are genuine examples of tomahawks dating back to the Viking era, when both of these production methods were in use, the former seems to have been more common.
2: Adding the Steel tip and intensity treating
The edge of the hatchet would then be parted and opened up to embed a steel bit which was considered a harder and more solid edge for the edge. This is an old strategy that incredibly works on the exhibition of the hatchet.
The hatchet head is additionally heat treated and tempered to increase the metal's toughness and decrease its weakness. The hatchet head is heated to extremely high temperatures and then rapidly cooled as part of the rigorous treatment process, which hardens the metal. The metal must be warmed considerably more gradually during the treatment procedure, and then it must be allowed to return to room temperature naturally.
3: Making the Handle
A larger piece of wood was used to illustrate and then carve out the handle's frame. The wood would then be trimmed to the appropriate size for the handle after the extra material was removed. Hatchet Handles Underway
This stage would have been a much more difficult cycle in the Viking era, when tomahawks were restricted to basic hand tools, but it is much easier to accomplish now with the help of hardware and a belt sander.
Additionally, the wood on the handle should be fortunate enough to obtain some protection against evaporating with time and eventually contracting or breaking. A layer of oil seeps into the handle, helping to prevent it from disintegrating over time. This also has the added benefit of helping to slightly lengthen the wood, which results in a tighter fit between the handle and hatchet head.
4: Joining the handle and hatchet head
Joining a hatchet head to the handle can be done in two basic ways. The hatchet head was first moved down the handle until it reached the top, where it was thicker and wedged the head setup, after the handle was slightly tightened.
Cutting off a delicate strip of cloth at the handle's focal point and making the handle's finish a little more modest than the hatchet head's eye was the second, and much more secure, way. This allowed for the creation of an extremely safe connection between the handle and hatchet head by pounding in a wedge. This is how most contemporary tomahawks operate.
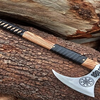
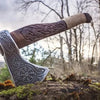
5: Adding Etchings and Handle Hold
Numerous authentic viking axe, for example, the mammen hatchet, include perplexing inscriptions to brighten the hatchet head and handle with Norse examples and symbolism. Additionally, different notices of runes were being added to Viking weaponry in the Norse adventures, which were remembered to have given them otherworldly properties. Hatchet Heads with Carving
The fundamental techniques for improving a hatchet head are either through corrosive carving, which certainly was not accessible during the Viking age, or by means of a more conventional etching strategy, which is likewise made a lot simpler with the assistance of current instruments. Hatchet head with Etching
You can add a handle grip by folding thread or cowhide over the handle, which will offer a lot of strength, even if you only have a few pins to connect the ends. Making sure there are no exposed edges that could catch and cause the wrapping to come away is a fantastic idea.
6: Making a Sheath
Sheath In the works
Since sheaths have been around since the beginning of time, it seems unlikely that the real Vikings would have been walking around all day with sharply sharpened tomahawks and little to no protection from the sharp edge, even though there isn't much hard evidence that they did. Calfskin Sheaths for Tomahawks
To make the sheath, first make a format that is somewhat bigger than the hatchet head and afterward cut it out from an enormous piece of cowhide. This should be rehashed two times, and afterward the different sides are sewn or stuck together to envelop the hatchet head, passing on space for the handle and an opening to permit the sheath to be taken out without any problem.
Purchase an instant Viking Hatchet
If you would still like a hatchet without the trouble of making one yourself, VikingStyle offers handcrafted tomahawks in a variety of legitimate and contemporary designs. However, making a hatchet requires a substantial amount of money and occasionally expensive hardware, which may be too much work for some people.
- Posted in:
- Handmade Viking Axe


